DsPIC30F 5011 Development Board
Contents
Introduction
Web Page
- Microchip
- dsPIC 16-bit Embedded Control Solutions Brochure
- dsPIC30F Family Overview
Forum
- Microchip: Official forum by Microchip
- MPLAB ICD 2: Subforum on ICD 2 programmer
- MPLAB IDE: Subforum on IDE
- MPLAB C30 Compiler, ASM30, Link30 forum: Subforum on C compiler. Refer to MPLAB C30 C Compiler User's Guide Chapter 3
- dsPIC30F Topics: Subformum on dsPIC30F
- HI-TECH Software Forum: Discussion on dsPICC, a C compiler developed by HI-TECH
- PICList: Discussion on older PIC systems (not dsPIC)
- PicKit: Discussion on PICkit/PICkit 2 programmers
References
- dsPIC30F
- ICD2 Programmer
- MPLAB
- C30 Compiler
Features of dsPIC
- Advantages
- 2.5 to 5V
- High current/sink source I/O pins: 25mA
- with DSP Instruction Set
- Dual programming techniques: ICSP and RTSP
- UART: up to 2 modules
- I2C: up to 1Mbps
- 10-bit A/D, 1.1 Msps
- 12-bit A/D, 500 ksps
- around 64K flash, 4K RAM, 1K eeprom
- Disadvantages
- No DAC
Selected Chip
- dsPIC30F, dsPIC30F5011
Programming Methods
- There are 2 programming methods: In-Circuit Serial Programming (ICSP) and Run-Time Self-Programming (RTSP)
- ICSP allows the devices to be programmed after being placed in a circuit board.
- RTSP allows the devices to be programmed when an embedded program is already in operation.
ICSP
- Two types of ICSP are available: ICSP and Enhanced ICSP. Both of them require setting ^MCLR to VIHH (9V – 13.25V).
- Standard ICSP
- Use external programmer (e.g. MPLAB® ICD 2, MPLAB® PM3 or PRO MATE® II) only.
- Required low-level programming to erase, program and verify the chip.
- Slower, because codes are serially executed.
- Refer to Section 11 for programming in ICSP.
- Program memory can be erased using Normal-Voltage (4.5 – 5.5V) or Low-Voltage (2.5V – 4.5V).
- Enhanced ICSP
- Use external programmer and Programming Executive (PE).
- PE is stored in the on-chip memory.
- PE allows faster programming.
- PE can be downloaded to the chip by external programmer using the standard ICSP method.
- PE contains a small command set to erase, program and verify the chip, avoiding the need of low-level programming.
- Refer to Section 8 for programming the PE.
- Hardware Interface
| Pin Label | Function | Pin Number |
|---|---|---|
| ^MCLR | Programming Enable | 7 |
| VDD | Power Supply | 10, 26, 38, 57 |
| VSS | Ground | 9, 25, 41, 56 |
| PGC | Serial Clock | 17 |
| PGD | Serial Data | 18 |
| Product Name | Interface with PC | Interface with Device | Price (US) | Postage (US) | Total (US) |
|---|---|---|---|---|---|
| MPLAB® ICD 2 | USB/RS232 | 6-PIN RJ-12 connector | $159.99 | - | - |
| PRESTO PIC Programmer Plus | USB | ? | $200.16 | $15.00 | $215.16 |
| Full Speed USB Microchip ICD2 Debugger and Programmer |
USB | 6-PIN ICSP connector 6-PIN RJ-12 connector |
$72.00 | $12.00 | $84.00 |
| Mini Microchip Compatible ICD2 Debugger and Programmer |
RS232 | 6-PIN ICSP connector 6-PIN RJ-12 connector |
$45.00 | $10.00 | $55.00 |
| ICDX30 | RS232 | 6-pin RJ-11 | $51.00 | $47.46 | $98.46 |
| Clone Microchip ICD2 | RS232 | 6-pin flat cables | $30.00 | $12.00 | $42.00 |
| Source | Schematic | PIC16F877A Bootloader |
|---|---|---|
| Patrick Touzet | Yes | HEX |
| Nebadje | Yes | Zip |
- Software Interface
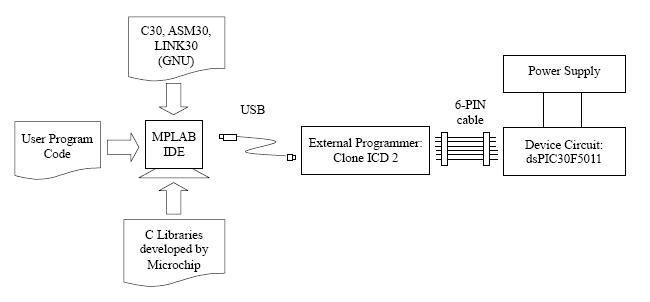
- The program can be written and compiled in an Integrated Development Environment (IDE) using either Assembly or C. The complied codes are then loaded to the device through the external programmer.
| Product Name | Features | OS | Price (US$) |
|---|---|---|---|
| MPLAB® IDE | Assembler Only | Windows | Free |
| MPLAB® C30 | Assembler and C-Compiler | Windows | $895.00 (Free student version1) |
| Piklab 0.12.0 | Assembler and C-Compiler | Linux | Free2 |
- Full-featured for the first 60 days. After 60 days only optimization level 1 can be enabled in the compiler. The compiler will continue to function after 60 days, but code size may increase.
- The current version supports external programmer ICD 2, but not yet tested.
RTSP
- RTSP works in normal voltage (^MCLR no need to raise to VIHH).
- No literature has mentioned the incorporation of Programming Executive (PE). Presumably, since Enhanced ICSP needs to set ^MCLR to VIHH, RTSP cannot use PE.
Design Circuit and PCB
IC Requirements
| Part No. | Description | Min Temp | Max Temp | Min Volt | Max Volt | Typ Cur | Max Cur |
|---|---|---|---|---|---|---|---|
| dsPIC30F5011-30I/PT | uP | -40oC | 125oC | 2.5V | 5.5V | 250mA | |
| MAX3232ESE | RS232 driver | -40oC | 85oC | 3.0V | 5.5V | 0.3mA | 1.0mA |
| ADM483E ANZ | RS485 driver | -40oC | 85oC | 4.5V | 5.5V | 0.036mA | |
| DAC6574DGS | 10-bit Quad-DAC I2C | -40oC | 105oC | 2.7V | 5.5V | 0.6mA | 0.9mA |
| 74HC14D | Quad-Schmitt Trigger | -40oC | 125oC | 2.0V | 6.0V | 50mA | |
| Overall | -40oC | 85oC | 4.5V [1] | 5.5V | <310mA [2] |
- Minimum voltage measured is 3.2V (with 2 LEDs blinking)
- Measured current at 5V is 180mA (with 2 LEDs blinking only)
Development Environment
Windows
- C-Compiler, Assembler and Linker are under GNU license.
- MPLAB C30 C Compiler (*.c -> *.s)
- MPLAB ASM30 Assembler (*.s -> *.o)
- MPLAB LINK30 Linker (*.o -> *.exe)
- PA optimizer, simulator, runtime libraries, header files, include files, and linker scripts are not covered by GNU. Reference is here.
- Microchip has integrated ASM30, LINK30, assembly header files, linker scripts in MPLAB IDE, which is free for download.
- MPLAB C30 costs US$895. A 60-day free student version is also available. After 60-days, the optimizer is automatically disabled, while other tools can still function properly. Refer to Table 2.4.
- C-libraries contained in C30 includes (Refer to 16-Bit Language Tools Libraries from Microchip).
| Library | Directory (\\Microchip\MPLAB C30) |
Major functions |
|---|---|---|
| DSP Library (e.g. libdsp-coff.a) |
\lib \src\dsp \support\h |
Vector, Matrix, Filter, etc. |
| 16-Bit Peripheral Libraries (e.g. libp30F5011-coff.a) |
\lib \src\peripheral \support\h |
ADC12, IOPort, UART, I2C, etc. |
| Standard C Libraries (e.g. libc-coff.a, libm-coff.a, libpic-coff.a) |
\lib \src\libm \include |
stdio.h, time.h, float.h, math.h, |
| MPLAB C30 Built-in Functions | none | _buildin_addab, _buildin_add, _buildinmpy, etc |
Linux
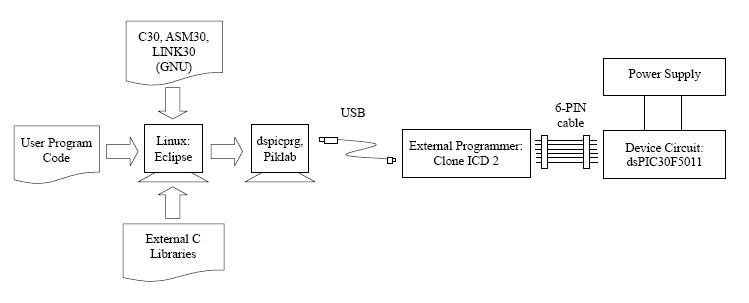
- C Compiler, Assembler and Linker are under GNU license.
- The code can be downloaded from Microchip at here.
- Current MPLAB ASM30 Assembler: v2.04
- Current MPLAB C30 Compiler: v2.04
- John Steele Scott has made templates that can be readily used by Debian-based systems. Someone at http://noel.feld.cvut.cz/dspic/ has done the necessary conversion to *.deb already.
- Download pic30-1.32-debian.tar.bz2 for Template v1.32. (For v2.01, please goto pic30-debian-2.01.tar.bz2).
- Download pic30-binutils_1.32-1_i386.deb for the assember.
- Download pic30-gcc_1.32-1_i386.deb for the compiler.
- Important Note: Only the compiler is free. The header files and library is owned by Microchip.
- Thomas Sailer suggested to download the Student version of C30 compiler and then build the libraries without source code. A package template for Fedora system is available here.
- Instructions for filling the upstream direction is available here.
- Alteratively, Stephan Walter has started a project to develop C Runtime Library for dsPIC.
- Current libraries in version 0.1.1 include: assert.h, cdefs.h, ctype.h, errno.h, inttypes.h, stdint.h, stdio.h, stdlib.h, string.h
- Burning Program Codes to Target Board
- Use 'dspicprg and dspicdmp' utilities developed by Homer Reid to burn hex code (*.hex) to devices. See Reference here. Through serial port only?
- Use Piklab IDE. Details on file format not known.
- Use MPLAB IDE to burn hex code (*.hex) to devices.
Using ICD 2 Programmer
MPLAB IDE
- Install IDE and USB Driver
- Do NOT connect ICD 2 (via USB) to PC.
- Install MPLAB IDE.
- Install USB driver by following the instruction in (C:\Program Files\Microchip\MPLAB IDE\ICD2\Drivers\Ddicd2.htm)
- Establish Conncetion with ICD 2
- Connect ICD 2 to PC. Do NOT connect target (via 6-pin cable) to ICD 2.
- Run MPLAB IDE on PC.
- Open an existing project (Project>Open)
- Select MPLAB ICD 2 as the current programmer (Programmer>Select Programmer>MPLAB ICD 2)
- Configure the USB Interface (Programmer>Settings, Communications Tab)
- Establish connection with ICD 2 (Programmer>Connect)
You should see "Connecting to MPLAB ICD 2...Connected."
You should also see Warnings regarding downloading OS to device, invalid device IDs, and/or running self tests. Ignore these warnings since the target board has not been connected yet.
- Establish Connection with Target
- Uncheck the option “Power target circuit from MPLAB ICD” (Programmer>Settings, Power Tab). Place Jumper on target board. Power the Target.
- Establish connection with target through ICD 2 (Programmer>Connect).
- See results of self test (Programmer>Settings, Status Tab).
- Program the Device
- Programmer>Program
PikLab
- Under construction
dspicprg
- Under construction

